- Intro
1.1 Demo / Source Code
1.2 What is Raycasting? - The Map
2.1 Scaling - Raycasting <--The fun part!
3.1 Angle Calculation
3.2 Wall Hit Detection
3.3 Distance Calculation
3.3.1 Ray Movement Calculation
3.3.2 Projection Calculation
3.3.3 Center FOV Vector Calculation
3.3.4 Dot Product Calculation - The Screen
4.1 Vertical Columns - Optimization
5.1 FOR loops over GOTO loops
5.2 Minimize lines of code
5.3 Avoid ECHOs
5.4 Final Solution - Conclusion
This article explores the solutions I used in the creation of a retro-style 3D raycaster in Batch (Windows .bat file type). Batch is, frankly, an awful and inefficient language. However, it can be incredibly fun to code in, and always yields interesting solutions to what are otherwise trivial problems in most languages.
The biggest hurdle with Batch is its very slow execution time and lack of floating point arithmetic. The solutions used for optimization and avoiding floating point arithmetic (notably the avoidance of traditional trigonometry) are explored in this article.
1.1 Demo / Source Code
1.2 What is Raycasting?
Raycasting works by assigning every vertical column of the user's screen to a ray on a 2D top-down representation of the player's map, where the rays span the player's FOV. How far a ray can emanate from the player before hitting a wall corresponds to how tall of a line gets drawn in its vertical column. This means walls that are far away yield small vertical lines, and walls that are close yield large vertical lines.
So raycasting relies on one basic principle: Things look smaller when they are farther away.
Please check out Lode Vandevenne's fantastic article on raycasting for a full explanation of floating point raycasting. My article focuses on explaining the integer-only Batch solutions to raycasting, which are better understood by first knowing how floating point raycasters work.
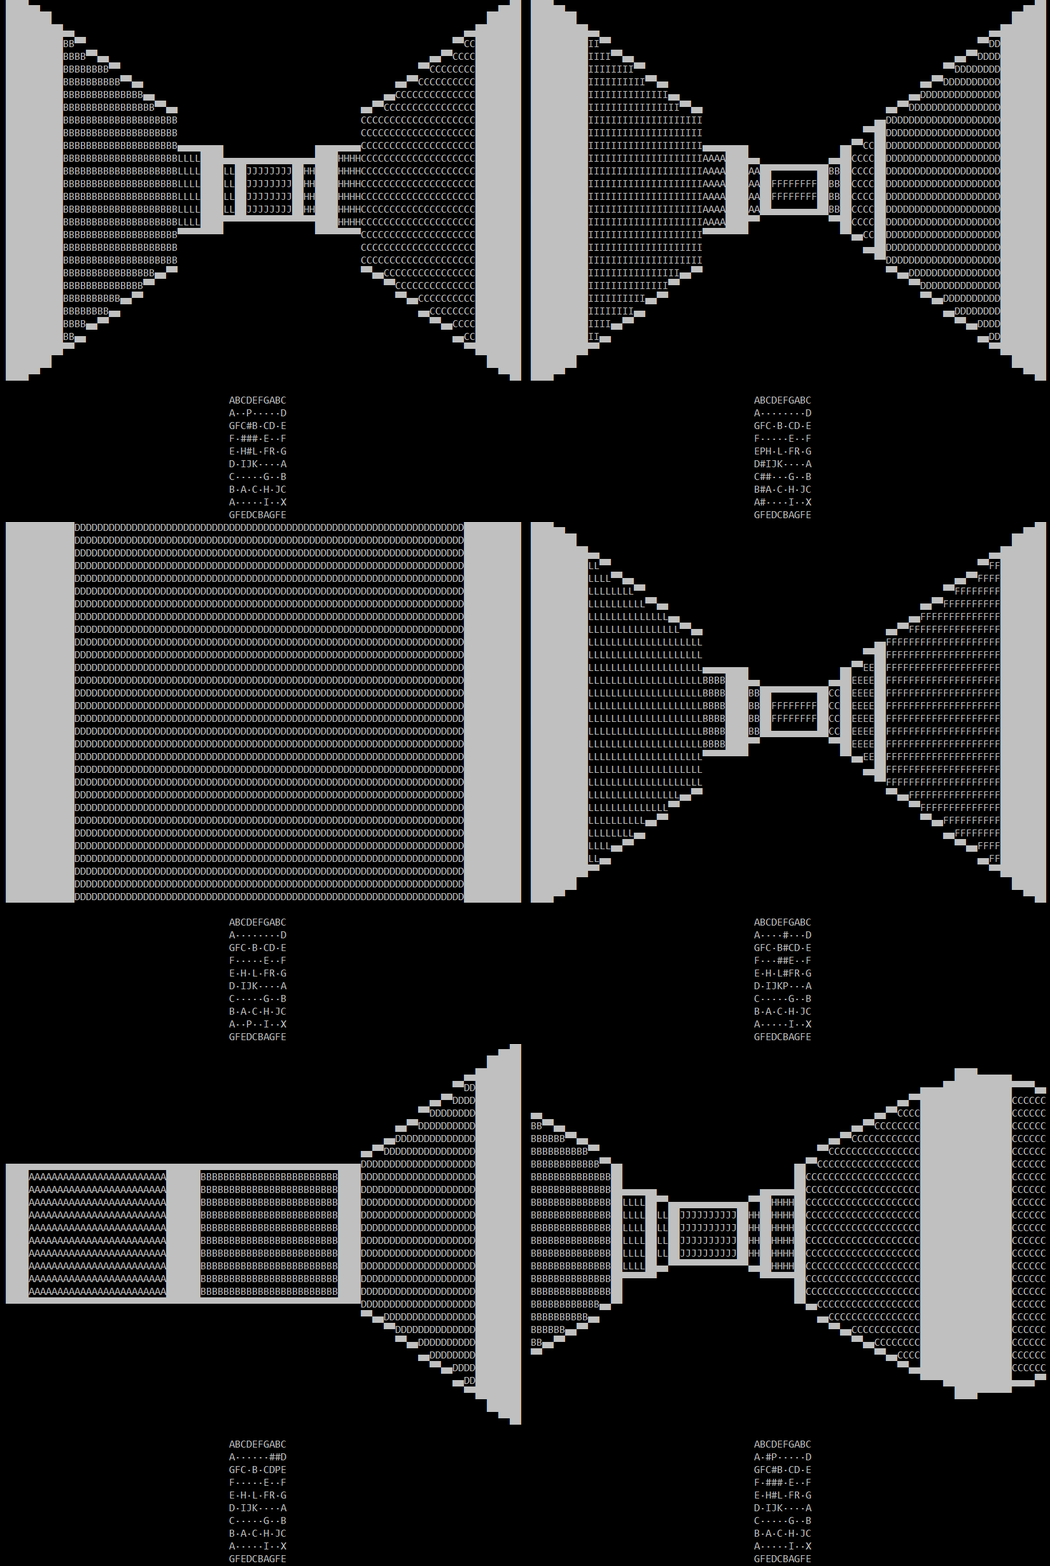
The first thing I had to do was figure out some way to store the map. This was accomplished using dynamic variable naming, which is the Batch equivalent to arrays. First the map is stored in a text file as shown.

Note the highlighted P. This denotes where the player is in the map. You may also note the dots used instead of blank spaces. Batch is basically incapable of comprehending blank spaces in strings, so some filler character must be used instead. This map is 10x10, but the raycaster can support larger maps.
The map is then read line by line, and character by character. Each character is then assigned to its appropriate coordinate, saving the player's coordinates separately.
2.1 Scaling
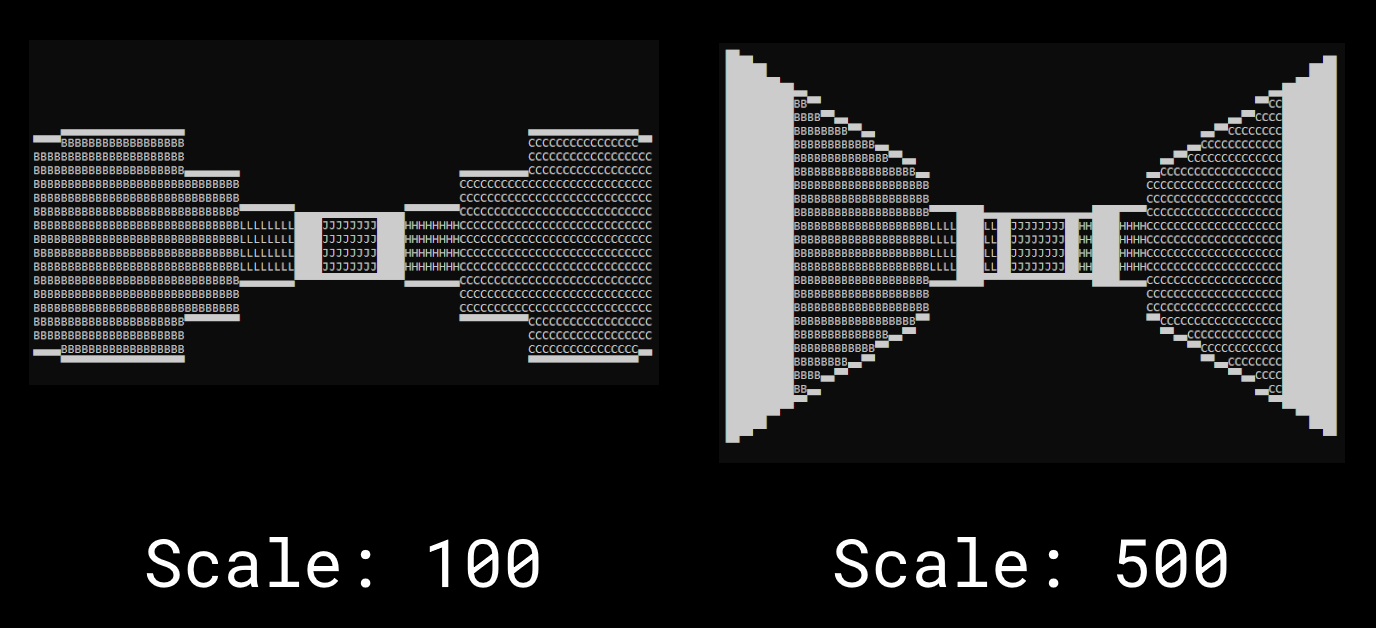
Scaling is very simple. The coordinate system used is not actually 10x10 from the map. Instead, every x and y coordinate is scaled by some number, 500 for example, meaning the grid is actually 5000x5000, with a different cell every 500 units. This also makes all calculated distances large enough that any the amount of detail lost in integer rounding is insignificant.
This is the trickiest part of this project. Our main problem is that we cannot use cosine or sine to calculate the x and y change of our ray's movement vector as it emanates from the player. One possible solution is an implementation of sine and cosine via their Taylor Series definitions, but this is ultimately too costly of a calculation for each ray, and requires more and more iterations as the angle approaches multiples of 90. Instead, a solution that involves the simple addition and subtraction of the x and y component of the vector is used.
3.1 Angle Calculation
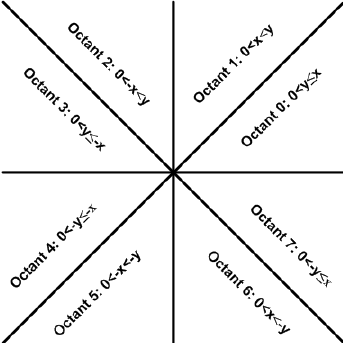
First, the input angle is noted. This angle defines the left-most ray to be used. First we divide this value by 45. Since Batch is integer-only, these yields a floored answer. This number denotes what octant the angle is in from 1 to 8 (technically 0 to 7). This is similar to quadrants, which are separated by 90 degrees and number from 1 to 4.
::Define what octant the angle is within
set /a octant=!angle!/45
The octant is then re-multiplied by 45, which results in the next-lowest 45 degree multiple relative to the original angle. The original angle then subtracts this number, which yields exactly how far inside the octant from 1-45 degrees the angle is.
set /a oct_angle=!octant!*45
set /a oct_angle=!angle!-!oct_angle!
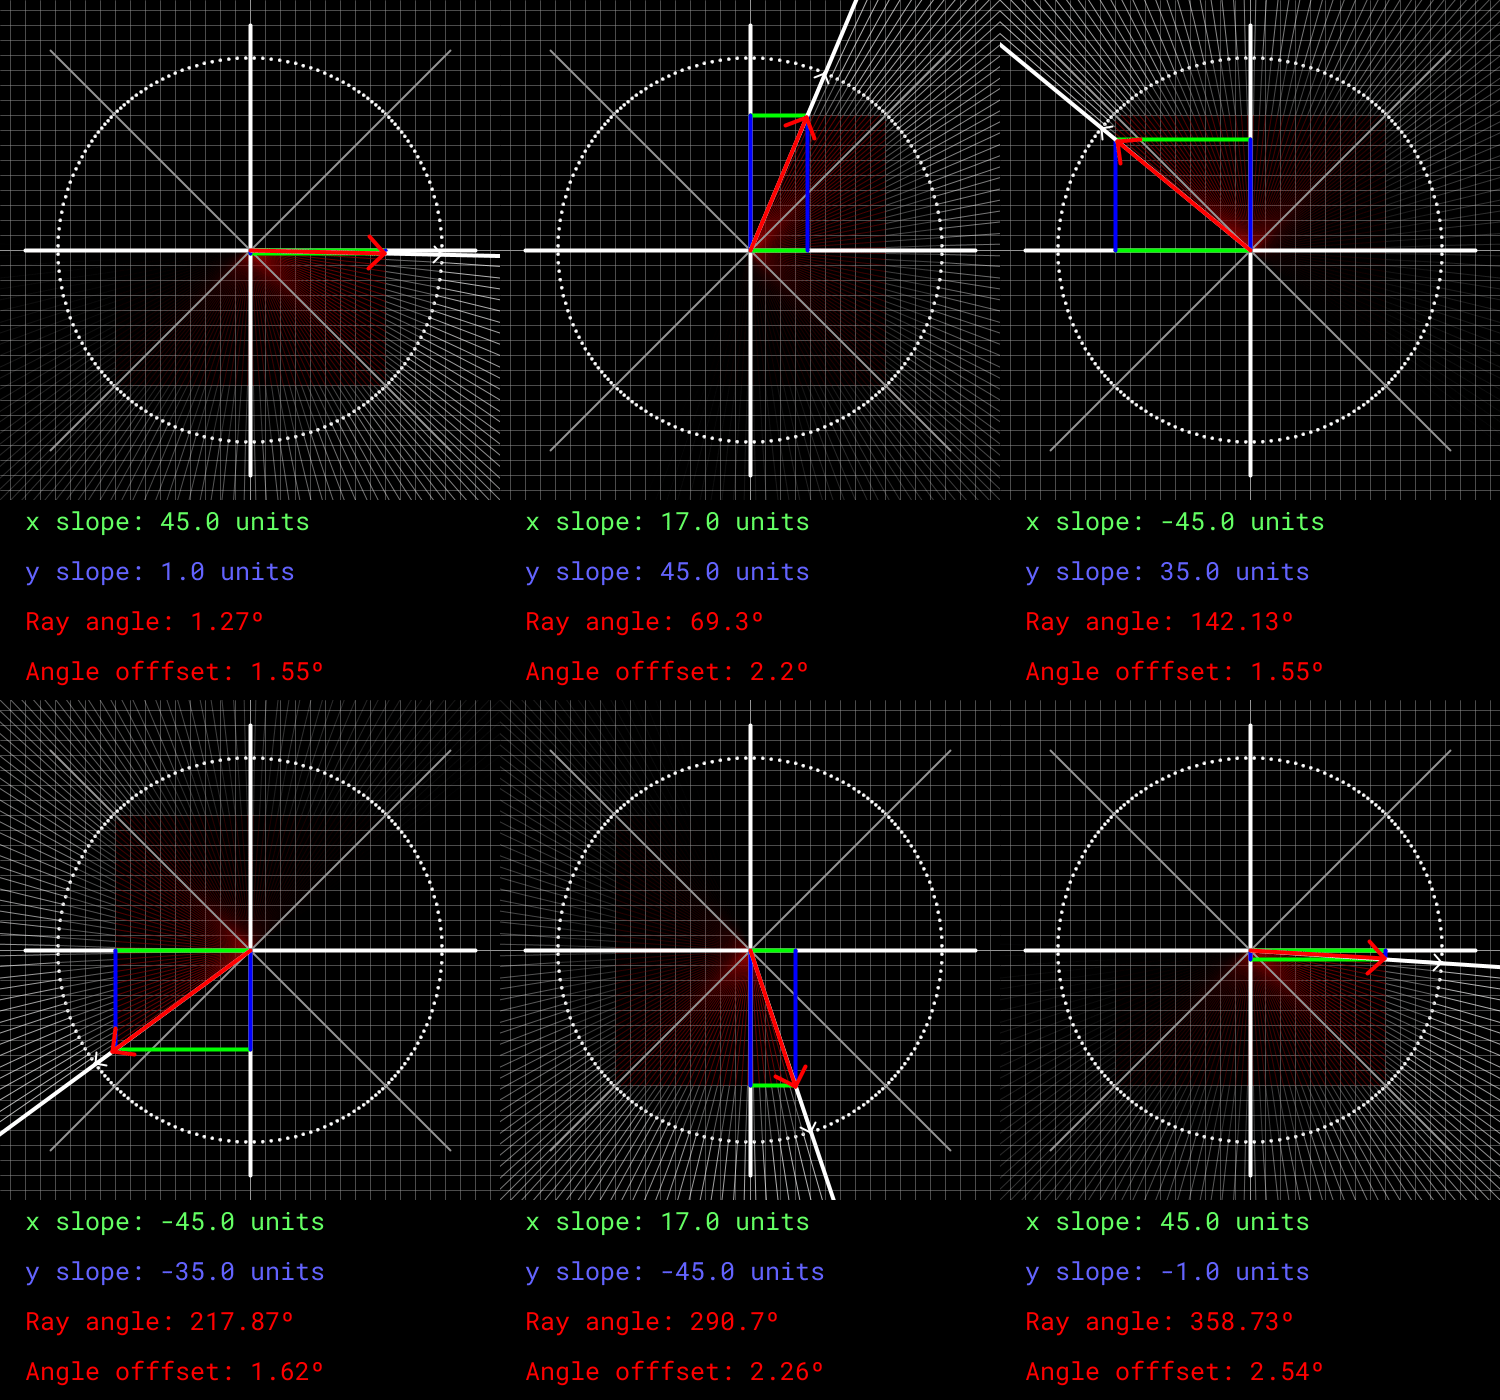
This is where things get weird. Any notion of our angle mapping to actual degrees is gone. We are now going to use the oct_angle as either an x or y component of our ray's movement vector. Which component it effects and whether it is increasing or decreases is decided by what octant the angle is current within. The subsequent ray will then move by subtracting or adding 2 to the oct_angle. This process is a bit weird to explain, but it can be easily visualized as shown below.
 |
|---|
As can be seen, the x and y component are defined by the oct_angle value, which moves 2 units in between every ray. When the x or y component reach -45 or 45, it sticks to that value and swaps to the other component. This isn't perfect. The oct_angle defines how far in the octant the desired ray is in using degrees, and cannot be mapped 1-to-1 to either the x and y component of a Cartesian system.
However, if we bound the x and y components to within +45 and -45 units, a rough approximate of the desired angle can be obtained. The offset also equalizes out every 90 degrees, which is perfect for having an FOV of 90. This is why the screen is 45 pixels wide, as a change of 2 units per ray yields 90 degrees. Every single ray within the FOV will not move perfectly by 2 degrees in terms of its true angle, but it yields a close-enough approximation.
3.2 Wall Hit Detection
Whether or not the current x and y coordinate of the ray, vx and vy, are within a wall is checked by unscaling them and examining those floored coordinates against the map. Additionally, corner detection occurs here, where if the ray is 1/8th of the way between the corner of a cell then it draws a filled in line instead of the walltype.
::The coordinates to check for walls
set /a checkx=!vx!/!scale!
set /a checky=!vy!/!scale!

::Calculations used for corner detection
set /a corner_hit=0
set /a ccx_low=!vx!-!corner_thresh!
set /a ccx_high=!vx!+!corner_thresh!
set /a ccy_low=!vy!-!corner_thresh!
set /a ccy_high=!vy!+!corner_thresh!
set /a ccx_low=!ccx_low!/!scale!
set /a ccx_high=!ccx_high!/!scale!
set /a ccy_low=!ccy_low!/!scale!
set /a ccy_high=!ccy_high!/!scale!

::Check whether the current vector + or - the corner threshhold is defined
::as a different cell and, therefore, near the edges of the cell. This can
::only ever be the case for 1 of the x checks and 1 of the y checks, but if
::it is the case for both, then the ray must be near a corner. If this occurs
::then corner_hit will get added to twice.
if not "!mapx%ccx_low%y%checky%!"=="!mapx%checkx%y%checky%!" (
    set /a corner_hit=!corner_hit!+1
)
if not "!mapx%ccx_high%y%checky%!"=="!mapx%checkx%y%checky%!" (
    set /a corner_hit=!corner_hit!+1
)
if not "!mapx%checkx%y%ccy_low%!"=="!mapx%checkx%y%checky%!" (
    set /a corner_hit=!corner_hit!+1
)
if not "!mapx%checkx%y%ccy_high%!"=="!mapx%checkx%y%checky%!" (
    set /a corner_hit=!corner_hit!+1
)

::Check if the current cell is empty or not.
::If it is, then draw that column to the screen.
if "!mapx%checkx%y%checky%!"=="·" (
    set mapx%checkx%y%checky%=#
) else if "!mapx%checkx%y%checky%!"=="P" (
    rem
) else if "!mapx%checkx%y%checky%!"=="#" (
    rem
) else (
    set walltype=!mapx%checkx%y%checky%!
    goto :draw_line
)
rem is used as just a filler command that does nothing.
3.3 Distance Calculation
We don't simply step along the map by the x and y components of the current ray's vector bit-bit-bit. Instead, we use DDA to massively speed up calculation.
3.3.1 Ray Movement Calculation
Ray movement is calculated using DDA, which works by determining the shortest distance to the next cell in the movement direction. This distance is quickly and easily calculated and traversed in one go, sidestepping the need to move along a single cell bit-by-bit dozens of times if we already know the current cell is empty.
The code follows the form of the algorithm below, where $ h_{x,y} $ are the x and y components of the movement vector. Assume all operations are floored. Flooring is specified and shown where it is vital to the function of the algorithm (like dividing by a number and immediately multiplying the same number)
- $ \text{frac} _ {x,y}=v_{x,y}-\operatorname{floor}\left(\frac{v_{x,y}}{ \text{scale} }\right)\cdot \text{scale} $
- Is $ h_{x,y} < 0 $?
- If yes, $ \text{frac} _ {x,y}=\text{scale}-\text{frac} _ {x,y} $
- $ \text{mult} _ {x,y}=\left|\operatorname{floor}\left(\frac{ \text{frac} _ {x,y}}{h_{x,y}}\right)\right|+1 $
- Is $\text{mult} _ {x} < \text{mult} _ {y} $?
- If yes, $ \text{move} _ {x,y} = \text{mult} _ {x} \cdot h_{x,y} $
- If no, $ \text{move} _ {x,y} = \text{mult} _ {y} \cdot h_{x,y} $
- $ v_{x,y} = v_{x,y} + \text{move} _ {x,y} $
::The base vector for this ray, hx and hy
if "!priority!"=="x" (
    set /a hx=!xdir!*!oct_angle!
    set /a hy=!ydir!*45
) else (
    set /a hy=!ydir!*!oct_angle!
    set /a hx=!xdir!*45
)

::Determine distance to nearest edge of cell
set /a floor_x=!vx!/!scale!
set /a floor_y=!vy!/!scale!
set /a frac_x=!floor_x!*!scale!
set /a frac_y=!floor_y!*!scale!
set /a frac_x=!vx!-!frac_x!
set /a frac_y=!vy!-!frac_y!
if !hx! GTR 0 (
    set /a frac_x=!scale!-!frac_x!
)
if !hy! GTR 0 (
    set /a frac_y=!scale!-!frac_y!
)

::Find how many steps are needed to reach the edge of the cell
set /a mult_x=!frac_x!/!hx!
set /a mult_y=!frac_y!/!hy!
if !mult_x! LSS 0 (
    set /a mult_x=!mult_x!*-1
)
if !mult_y! LSS 0 (
    set /a mult_y=!mult_y!*-1
)
set /a mult_x+=1
set /a mult_y+=1

::Whichever direction reaches the edge of the cell first is used
if !mult_x! LSS !mult_y! (
    set /a move_amt=!mult_x!
) else (
    set /a move_amt=!mult_y!
)
set /a move_amt_x=!move_amt!*!hx!
set /a move_amt_y=!move_amt!*!hy!

::Move the ray to the edge of the cell
set /a vx=!vx!+!move_amt_x!
set /a vy=!vy!+!move_amt_y!
Calculating the distance between two points on the scaled map isn't necessarily too difficult - however we can't use just the unmodified distance. If we do that, we'll be left with a fish-eye-lense effect. In order to circumvent this, we need to calculate the distance of the wall hit to the normal vector of the center of the player's FOV
3.3.2 Projection
I actually stumbled across the answer to this problem the very same day I encountered it while attending my Calculus 2 class, as this is equation that determines the shortest distance between a plane and a point that exists off the plane. We can calculate our desired distance without using any trigonometric functions by using Equation 1.
$$ d=\frac{\left|\hat{n}\cdot \hat{v}\right|}{\left|\left|\hat{n}\right|\right|} \ \ \ \ \ (1) $$ where $d$ is our desired distance, $n$ is the vector denoting the center of the player's FOV, and $v$ is the ray's vector. Equation 2 is Equation 1 with the mathematical symbols fully expanded.
$$ d=\frac{|n_{x}v_{x}+n_{y}v_{y}|}{\sqrt{n_{x}^{2}+n_{y}^{2}}} \ \ \ \ \ (2) $$ where $n_x$, $n_y$, $v_x$, $v_y$ are the $x$ and $y$ components of their respective vectors. This method is extremely useful because $n$ can be any scalar multiple of itself, but its distance does define the scale of the projection.
3.3.3 Center FOV Vector Calculation
We need to find both the vector for the center of the player's FOV as well as it's distance. To do this, we simply take the x and y component yielded from the method described in 4.1. These are stored as nx and ny.
Now we need to find the length of these vectors for the denominator of Equation 2. Batch does not have a built-in square root function, which is needed to find the hypotenuse of the right triangle created by the x and y components. So we'll use an implementation of the Babylonian method of square roots. This algorithm is ran for 30 iterations, which yields accurate enough results.
::Prepare the radicand for the pythagorean calculation
set /a tnx=!nx!/2
set /a tny=!ny!/2
set /a tnx=!tnx!*!tnx!
set /a tny=!tny!*!tny!

::Take the square root of the radicand. Babylonian Method used.
set /a toberooted=!tnx!+!tny!
set /a high=2
for /l %%x in (1, 1, 30) do (
    set /a low=!toberooted!/!high!
    set /a high=!low!+!high!
    set /a high=!high!/2
)
::Final distance of n
set /a n_distance=!high!
3.3.4 Dot Product Calculation
Now we need to calculate the numerator of Equation 2.
::The player's scaled x and y coordinates.
set /a tpx=!px!*!scale!+!scale_half!
set /a tpy=!py!*!scale!+!scale_half!

::The distance between the ray's collision point and the player
set /a vx=!vx!-!tpx!
set /a vy=!vy!-!tpy!

::Ensure all terms are positive.
if !vx! LSS 0 (
    set /a vx=!vx!*-1
)
if !vy! LSS 0 (
    set /a vy=!vy!*-1
)

::Calculate the dot product of center of FOV vector and the raycasted vector
set /a dot_x=!vx!*!nx!
if !d! LSS 0 (
    set /a n_distance=!dot_x!*-1
)
if !dot_x! LSS 0 (
    set /a dot_x=!dot_x!*-1
)
set /a dot_y=!vy!*!ny!
if !dot_y! LSS 0 (
    set /a dot_y=!dot_y!*-1
)
set /a dot=!dot_x!+!dot_y!

::Divide the dot product by the length of the center of FOV vector
set /a d=!dot!/!n_distance!
The coordinates for the screen are generated using dynamic variable naming.
for /l %%y in (1, 1, !height!) do (
	for /l %%x in (1, 1, !width!) do (
		set x%%xy%%y=·
	)
)
where height=30 and width=45. As mentioned previously, a filler whitespace is used as Batch cannot easily process whitespace in strings.
The screen can then be printed by iterating through these variables as shown.
::Print the screen from the x and y coordinate variables
:print_screen
::  Refresh the current line
	set screen=
::	Used to replace the filler whitespace with true whitespace
	set "temp_whitespace=·"
	set "real_whitespace= "

::	Iterate through screen coordinates
	for /l %%y in (1, 1, !height!) do (
		for /l %%x in (1, 1, !width!) do (
			set column=!column%%x!
			set pixel=!column%%x:~%%y,1!
			set screen=!screen!!pixel!!pixel!
		)
		::Print the screen row and replace the filler whitespace.
		echo: !screen:%temp_whitespace%=%real_whitespace%!
		set screen=

	)
	goto :eof
where column is the "array" the holds the vertical columns for that particular column.
4.1 Vertical columns
In a normal raycaster you would generate the vertical columns on the fly. While that is undoubtedly the most dynamic solution, Batch runs the fastest when you go ahead and do as much of the work that you can ahead of time. I use a set of variables that represent all possible vertical columns, stored horizontally as a string.
set d30=A···············▀··············B
set d29=A··············▄▀··············B
set d28=A·············▄##▀·············B
set d27=A·············▀##▄·············B
set d26=A············▄####▀············B
set d25=A············▀####▄············B
set d24=A···········▄######▀···········B
set d23=A···········▀######▄···········B
set d22=A··········▄########▀··········B
set d21=A··········▀########▄··········B
set d20=A·········▄##########▀·········B
set d19=A·········▀##########▄·········B
set d18=A········▄############▀········B
set d17=A········▀############▄········B
set d16=A·······▄##############▀·······B
set d15=A·······▀##############▄·······B
set d14=A······▄################▀······B
set d13=A······▀################▄······B
set d12=A·····▄##################▀·····B
set d11=A·····▀##################▄·····B
set d10=A····▄####################▀····B
set d9=A····▀####################▄····B
set d8=A···▄######################▀···B
set d7=A···▀######################▄···B
set d6=A··▄########################▀··B
set d5=A··▀########################▄··B
set d4=A·▄##########################▀·B
set d3=A·▀##########################▄·B
set d2=A▄############################▀B
set d1=A▀############################▄B
set d1=A##############################B
The A and B at the start and end of the line assist with whitespace later on in the code (as mentioned earlier, Batch is horrendous when dealing with whitespace.) The columns are set to the appropriate column variable after the distance, d, has already been calculated.
::Calculate the final unscaled distance value to access the write d# column.
set /a h=!height!
set /a h_scaled=!h!*!scale!
set /a distance=!h_scaled!/!d!
set /a distance=!h!-!distance!

::Keep things within bounds
if !distance! LSS 1 (
    set /a distance=1
)
if !distance! GTR !h_scaled! (
    set /a distance=!h!
)

::The vertical column for the distance calculated
set view=!d%distance%!

::Replace wall-characters with the associated character on
::the map and ensure corners are fully filled in the edges
if !corner_hit! LSS 2 (
    set view=!view:#=%walltype%!
) else (
    set view=!view:#=█!
    set view=!view:█▄=██!
    set view=!view:▀█=██!
)

::Set the column's contents
set column!screenx!=!view!
As mentioned at the start of this article, Batch is an awful language. When it comes to optimizing Batch, there are relatively few steps you can take.
5.1 FOR loops over GOTO loops
FOR loops are used as much as possible in this program, although GOTO loops are inevitable given FOR loop's inability to access a variable after updating it within the loop using the % variable markers. This prevents nested variables of the form !%example%!. Having to use GOTO loops in some spaces leads into the next problem.
5.2 Minimize lines of code
Batch reads files line-by-line, and runs faster when multiple commands are executed on the same line. Additionally, GOTO does not jump straight to the listed label - instead, it reads downward until it finds the label and loops back up to the top if it isn't found below the GOTO call. This means that using GOTO to jump to a label below the call runs faster than if the label were above the call. This also means using fewer lines in the script overall makes GOTO loops and CALLs run faster.
5.3 Avoid ECHOs
This step is relatively easy to follow, but it does become annoying for whatever ECHOs you may use for debugging during long processes. This program uses an updating loading bar during calculations, but it only updates once per ray and does not significantly impact performance.
5.4 Final Solution
All the steps previously mentioned have been taken to help optimize this program as fast as possible, such that it generates a frame on average every 2 seconds. This can be optimized ever so slightly further, however, by taking 5.2 Minimize lines of code to the extreme. This renders the code effectively unreadable, but it renders a frame roughly every 1.5 seconds.
After executing as many commands on the same line as possible, the raycaster goes from ~550 lines of code to ~100 lines - which is insane! This greatly speeds up the GOTO loops and gains roughly half a second per frame. 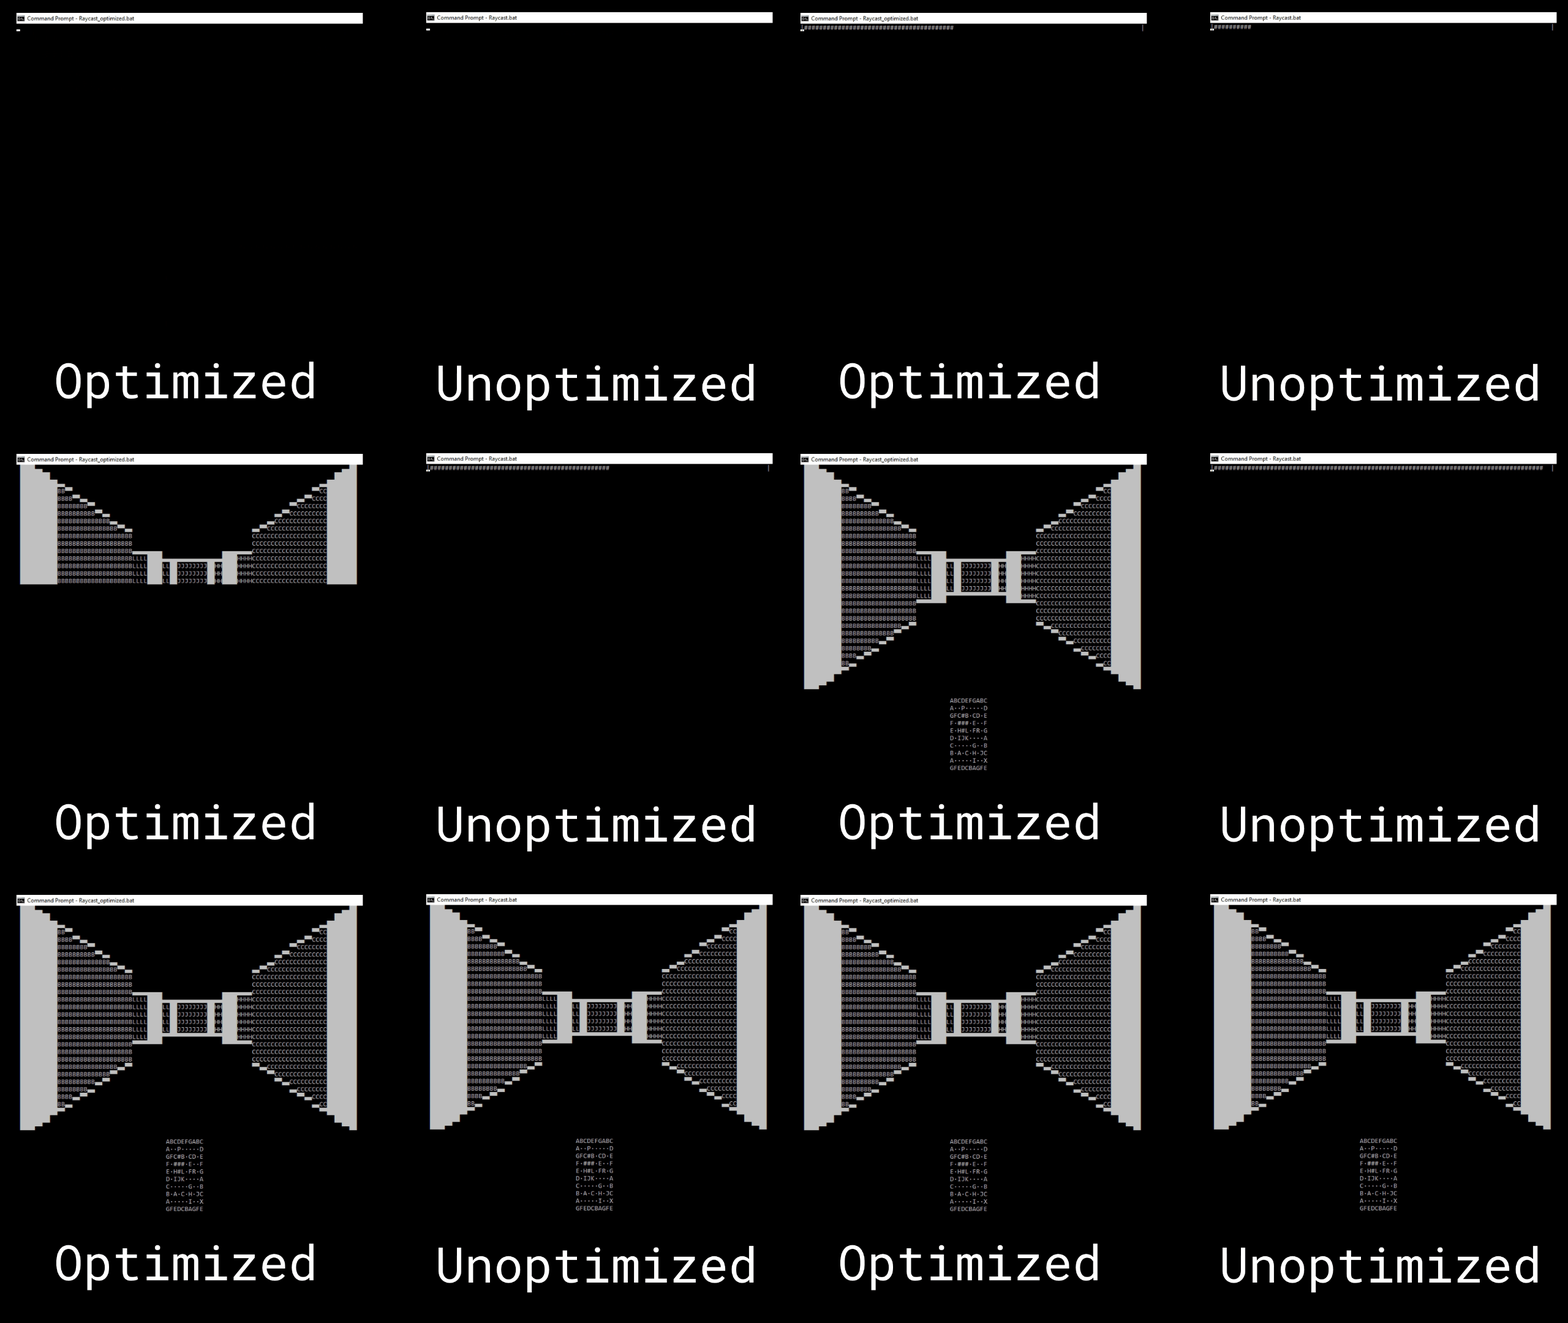 The optimized and completely unreadable version of the raycaster is also included over on this project's GitHub.
This project has been incredibly fun. This article was actually originally supposed to be a postmortem of my mostly abandoned Batch Raycaster. That old version of the program could render frames every 10-20 seconds, and also had a number of visual artifacts. Upon beginning the article and dissecting my old code, I found dozens of things that I could optimize. In the end, I'd say this raycaster isn't half bad.
I believe if there's any particular fix that should be made, it'd be my method of generating the x and y components of the ray's vector. The first one that comes to mind is pre-calculating vectors to be used and just accessing them when needed. 180 vectors would be needed though, which is a bit unweildy.
Again, be sure to try out the program for yourself over on GitHub, and check out my raycaster made in C++.
